Imagine a dessert that whispers elegance, sings of rich chocolate, and melts in your mouth with an ethereal lightness. Now, imagine achieving all of that without the fuss of a traditional double boiler or the intimidation of raw eggs. This isn't a culinary fantasy; it's the reality of creating a truly gourmet chocolate mousse right in your own kitchen. Forget complex techniques and hours of prep – we're about to show you how to whip up an easy chocolate mousse that’s as simple as it is spectacular.
Whether you're planning a romantic dinner, a celebratory gathering, or simply craving a moment of pure indulgence, this recipe is your secret weapon. It’s a game-changer for anyone who loves the luxurious taste of chocolate mousse but shies away from recipes requiring specialized equipment or a culinary degree. Prepare to impress yourself and your guests with a dessert that looks like it came from a high-end patisserie, yet is incredibly easy chocolate mousse to make.
Your Go-To Easy Chocolate Mousse: No Eggs, No Double Boiler, All Flavor
Traditional chocolate mousse often carries a reputation for being finicky. Many recipes call for tempering eggs (gently cooking them without scrambling) to create a custard base, or using a double boiler to melt chocolate perfectly, minimizing the risk of seizing. While these methods yield beautiful results, they can be daunting for the home cook and add layers of complexity and time to the process. Our approach strips away these intimidating steps without compromising on taste or texture.
The genius of this particular easy chocolate mousse lies in its elegant simplicity. We entirely skip the eggs, eliminating any concerns about raw egg safety or the delicate tempering process. Instead, we lean on the transformative power of microwave melted decadence without eggs – yes, your microwave is about to become your best friend for perfectly melted chocolate in mere moments. The light, airy texture that is the hallmark of a great mousse? That comes courtesy of perfectly whipped heavy cream, which incorporates air beautifully and provides a stable, luxurious base. This results in a rich and decadent chocolate dessert that is super simple to make, yet looks and tastes incredibly gourmet.
This streamlined method makes homemade chocolate mousse accessible to everyone, regardless of their baking experience. It’s a truly elegant dessert that looks professional, tastes divine, and delivers that universally loved combination of rich chocolate flavor and a remarkably light, airy texture. You can even make it ahead of time, making it an ideal choice for dinner parties where you want to spend more time with your guests and less time in the kitchen.
The Essentials: Simple Ingredients for Sublime Mousse
One of the most appealing aspects of this easy chocolate mousse recipe is its minimal ingredient list. You only need a handful of readily available items to create this spectacular dessert. Quality matters here, as each ingredient plays a crucial role in achieving that perfect balance of richness and delicate texture.
- Heavy Whipping Cream: This is the workhorse of our mousse, providing the essential lift and creamy body. When whipped, heavy cream transforms into a stable, airy cloud, which is key to achieving the mousse's characteristic texture. Ensure it's very cold before whipping for the best results.
- Chocolate: The heart and soul of your mousse. The type and quality of chocolate you choose will significantly impact the final flavor.
- Chocolate Chips: Widely available and convenient, chocolate chips come in milk, semi-sweet, and dark varieties. However, they often contain stabilizers to help them maintain their shape during baking, which can sometimes make them slightly trickier to melt to a perfectly smooth consistency. If using chips, ensure they are good quality.
- Chocolate Bars: Often preferred by connoisseurs, chocolate bars typically boast a higher cocoa content, purer chocolate flavor, and fewer stabilizers, resulting in a smoother, easier melt. While potentially a bit pricier, the difference in flavor and texture can be worth it.
Choosing Your Chocolate Intensity:
- Milk Chocolate (30-40% cocoa solids): For a sweeter, milder chocolate flavor, milk chocolate is a great choice. If opting for milk chocolate, you might consider reducing or omitting the powdered sugar, as it's inherently sweeter.
- Semi-Sweet Chocolate (50-60% cocoa solids): This is the classic, go-to option for chocolate mousse. It strikes a beautiful balance between sweetness and rich cocoa flavor, offering a deep chocolate profile without being overly intense.
- Dark Chocolate (60-75%+ cocoa solids): If you crave a bolder, more intense chocolate experience, dark chocolate is the way to go. The higher cocoa content delivers a profound, bittersweet flavor that truly shines. For those who appreciate a less sweet dessert, this is an excellent choice.
- Powdered Sugar (Confectioners' Sugar): This fine sugar dissolves easily into the heavy cream, ensuring a silky-smooth texture without any grittiness. It adds just the right touch of sweetness to balance the chocolate.
- Vanilla Extract: A splash of good quality vanilla extract enhances the chocolate flavor, adding depth and warmth without overpowering it.
With these four humble ingredients, you're well on your way to creating a dessert that tastes far more complex than it is to prepare.
Crafting Perfection: Your Step-by-Step Guide to Easy Chocolate Mousse
Ready to transform simple ingredients into a gourmet delight? Follow these steps, and you'll have a stunning chocolate mousse chilling in your fridge in no time.
- Melt the Chocolate (The Microwave Magic):
Break your chosen chocolate (chips or bar) into small, uniform pieces and place them in a microwave-safe bowl. Add about 1/4 cup of the heavy cream to the chocolate. Microwave on high in short bursts (15-20 seconds), stirring well after each interval, until the chocolate is fully melted and smooth. This typically takes about 1 to 1.5 minutes in total. The small amount of cream helps prevent the chocolate from overheating and seizing. Once smooth, set aside to cool slightly. It should still be warm and fluid, but not hot enough to melt your whipped cream later.
Pro Tip: Overheating chocolate in the microwave can make it seize and become grainy. Patience and frequent stirring are key here. - Whip the Cream to Perfection:
In a large, chilled mixing bowl (preferably metal), pour the remaining heavy whipping cream. Using an electric mixer (handheld or stand mixer with a whisk attachment) on medium-high speed, begin to whip the cream. As it thickens, gradually add the powdered sugar and vanilla extract. Continue whipping until soft peaks form. This means when you lift the whisk, the cream holds its shape but the tip gently curls over. Be careful not to over-whip, or it will become grainy and butter-like.
Why chilled? Cold cream whips faster and achieves a more stable, voluminous result. You can even chill your bowl and whisk for 10-15 minutes beforehand. - Combine with Care (The Folding Technique):
Gently fold about a third of the whipped cream into the slightly cooled melted chocolate mixture. This "lightens" the chocolate base, making it easier to incorporate into the rest of the whipped cream without deflating it. Once well combined, pour the lightened chocolate mixture into the bowl with the remaining whipped cream. Using a spatula, gently fold the chocolate into the cream in an upward, circular motion, scraping the sides of the bowl, until just combined and no streaks of white cream remain. The key is to be gentle to preserve as much air as possible in the mixture, which contributes to the mousse's light texture.
- Chill for Indulgence:
Spoon or pipe the chocolate mousse into individual serving dishes, such as ramekins, martini glasses, or small jars. Cover them lightly with plastic wrap and refrigerate for at least 2-4 hours, or ideally overnight, to allow the mousse to set and flavors to meld beautifully. Chilling is crucial for the mousse to firm up and achieve its signature silky texture.
Elevate Your Easy Chocolate Mousse: Serving & Customization Tips
Once your easy chocolate mousse is perfectly chilled and set, it's time for the final touches. This is where you can truly make it your own and elevate it from simple to show-stopping.
Sensational Serving Suggestions:
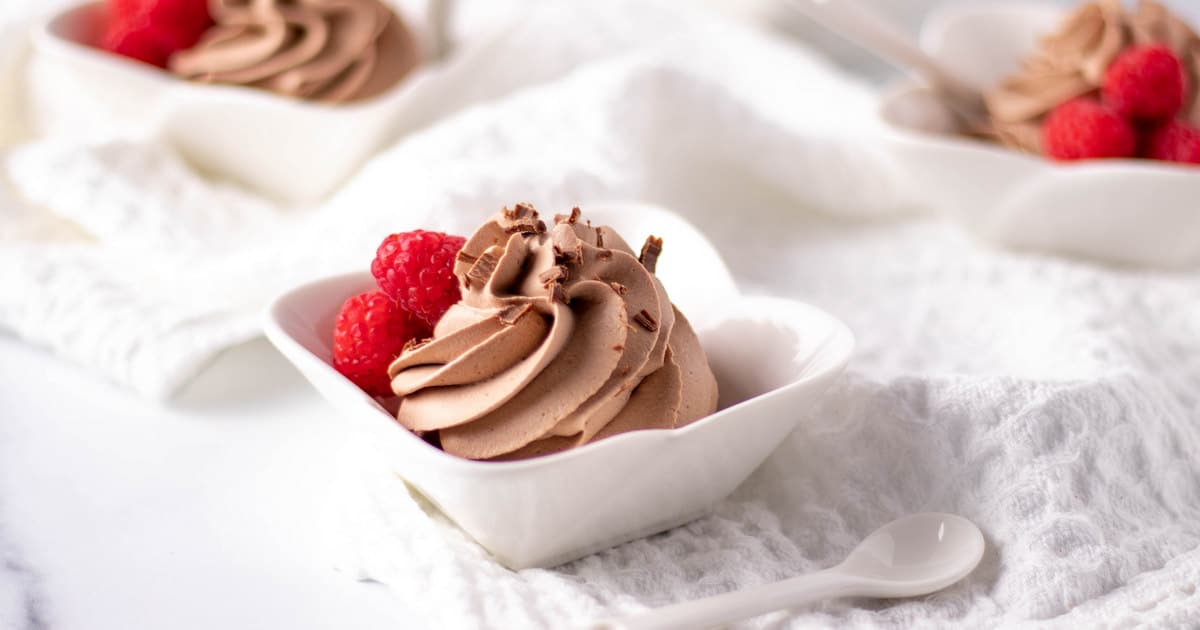
- Fresh Berries: A classic pairing! The tartness of fresh raspberries or sliced strawberries provides a delightful contrast to the rich chocolate. Blueberries or cherries also work wonderfully.
- Extra Whipped Cream: A dollop of freshly whipped cream on top, perhaps dusted with a touch of cocoa powder or chocolate shavings, adds another layer of luxury.
- Chocolate Shavings or Curls: A sprinkle of elegant chocolate shavings or curls instantly makes the dessert look more sophisticated.
- Cocoa Powder: A light dusting of unsweetened cocoa powder (use a fine-mesh sieve) adds a sophisticated touch and a hint of bittersweetness.
- Mint Sprig: For a pop of color and a refreshing aroma, a fresh mint sprig is always a lovely garnish.
- Coffee Beans: A few roasted coffee beans (ensure they are edible if using) can enhance the chocolate aroma and add a textural contrast.
Customization & Pro Tips:
- Flavor Boosters: For an extra layer of flavor, consider adding a tiny pinch of sea salt to the chocolate mixture (it enhances chocolate's sweetness), or a few drops of coffee extract, almond extract, or orange zest. A tablespoon of your favorite liqueur like Grand Marnier, Kahlúa, or Bailey's Irish Cream can also be folded in with the chocolate for an adult version.
- Make Ahead Magic: This mousse is an ideal dessert for entertaining because it needs to be made ahead. You can prepare it a day or even two in advance, allowing you to focus on other aspects of your meal. Store covered in the refrigerator.
- Storage: Leftover mousse (if there is any!) can be stored in an airtight container in the refrigerator for up to 3-4 days.
- Presentation Matters: While the flavor is paramount, presenting your mousse beautifully enhances the experience. Use clear glasses or elegant ramekins to showcase the rich color and smooth texture.
This easy chocolate mousse is more than just a dessert; it's an experience. It proves that gourmet quality doesn't have to come with gourmet effort. With minimal ingredients and straightforward steps, you can create a truly decadent, light, and airy chocolate masterpiece that will undoubtedly become a treasured recipe in your repertoire.
So, the next time a chocolate craving strikes or a special occasion calls for something spectacular, don't hesitate. Embrace the simplicity, savor the richness, and enjoy the magic of this homemade chocolate mousse. It's truly a show-stopper that will have everyone asking for the recipe, never guessing how incredibly easy it was for you to create.
